Invoices 
On Invoices, view invoice records and invoices with their details, add invoice records manually, and create, approve, and pay invoices.
- If the auto-generation of invoices is configured for the specific combination(s) of region, location, and department, the invoices will be automatically generated once a week (on the scheduled date and time and according to the preconfigured grouping) based on the pending invoice records.
Each invoice will be emailed separately to billing contacts with an Excel attachment. Recipients can approve invoices by navigating to the Einstein II web app from the email.
You can still generate the invoices manually if needed.
To find the needed invoices faster, use Filters that will be preserved on this specific page.
Invoices grouped by statuses
Invoices and invoice records are grouped by different statuses according to their progress and displayed on the corresponding tabs:
- On Pending Invoice Records, view invoice records (parts of approved timesheets or manual invoice records) that were sent by the Agency and approved by the Organization and create invoices from them. See the imageSee the image.
To see invoice records included in an invoice, select the arrow icon next to the needed invoice type (Timesheet, Expenses, or Miles.) For details, go to Create, approve, and pay invoice.
- On Manual Invoice Pending, view invoices created manually by your partnership Agency. You may approve or reject them by selecting the corresponding option in the grid. Hide the imageSee the image.
- This tab appears only if at least one invoice has been created manually by Agency and sent for approval to the Organization.

- On Pending Approval, view invoices waiting to be approved by the Organization. Hide the imageSee the image.

- On Pending Payment, view invoices waiting to be paid by the Organization. Hide the imageSee the image.

- On Paid, view invoices that were paid by the Organization. Hide the imageSee the image.

- On All Invoices, view all the invoices of different statuses, including the short paid and overpaid ones. Hide the imageSee the image.

Invoice record types
Invoice records are divided into different types according to the data indicated in their timesheets:
- Timesheet: when the timesheet with a defined number of working hours was approved.
- Expenses: when the timesheet with a defined amount of expenses was approved.
- Miles: when the timesheet with a defined number of miles was approved.
Create invoice record manually
To create an invoice record manually:
- On Manual Invoice Pending, select Add Manual Invoice.
- In the Add Manual Invoice sidebar, fill in all the required fields and upload a file with an actual invoice or other data related to the invoice.
- When you enter the order or position ID, the Agency, Candidate Name, Worked Location, and Worked Department fields will be prepopulated automatically. You can change the values if needed.
- Select Save in the upper right.
The manually created invoice record appears on Pending Invoice Records as a part of the invoice record that has the same Candidate and work week and that is created from the timesheet with the Expenses type. Hide the imageSee the image.

Then you may proceed with the steps described in Create, approve, and pay invoice.
Create, approve, and pay invoice
After the Organization approves the timesheet submitted by the Agency, the timesheet becomes an invoice record and is displayed on Pending Invoice Records.
To create, approve, and pay an invoice:
- (Optional) On Manual Invoice Pending:
- Approve the invoice. Then it will appear on Pending Invoice Records.
- Reject the invoice and add a reason. Then it will be sent back to Agency for modification. Hide the imageSee the image.

- The Manual Invoice Pending tab appears only if at least one invoice has been created manually by Agency and sent for approval to the Organization.
- On Pending Invoice Records, select the needed invoice record’s checkbox.
- In the Invoice By... dropdown menu in the upper right, choose the needed method to create the invoice. Hide the imageSee the image.
This will group the invoice records by the chosen criterion and generate as many invoices as there are different unique Agencies, Candidates, Cost Centres, Regions, and Locations in the selected timesheets list correspondingly.
But selecting the By Organization option will generate a single invoice with all the pending invoice records for your Organization. The created invoices will appear on Pending Approval.
- On Pending Approval, select Approve next to the needed invoice.
- You can also approve the invoice by choosing the needed invoice row and selecting Approve in the upper right of the invoice sidebar that opens. Hide the imageSee the image.

- You can also approve the invoice by choosing the needed invoice row and selecting Approve in the upper right of the invoice sidebar that opens. Hide the imageSee the image.
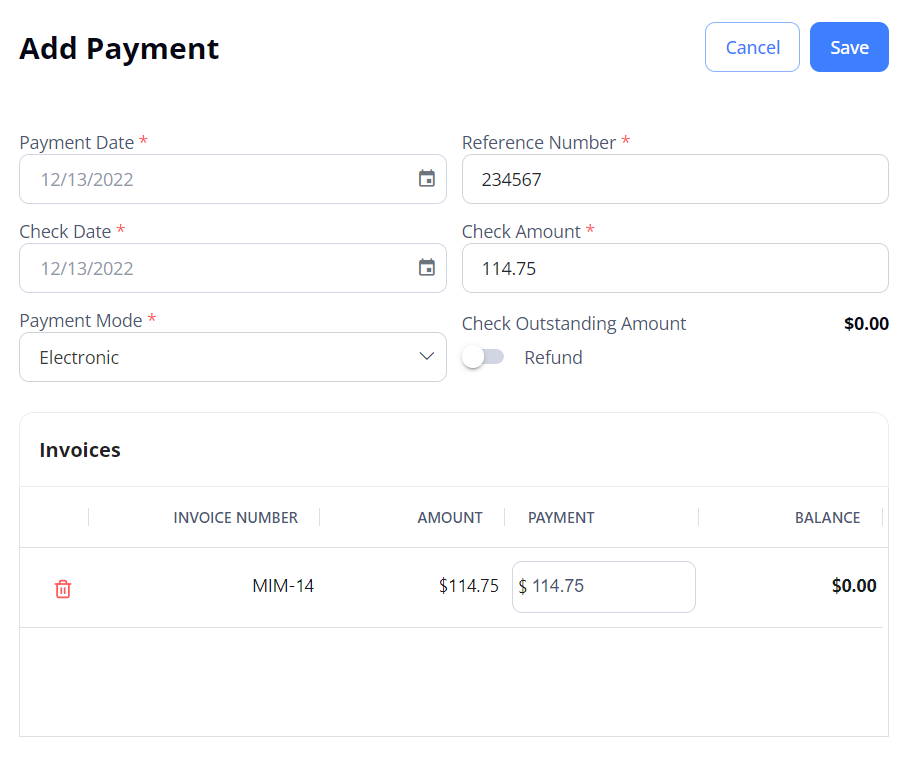
- On Pending Payment, select Pay next to the needed invoice (Hide the imageSee the image), and in the Add Payment sidebar, enter the payment details and select Save (Hide the imageSee the image.) This will be updated by the Hallmark Finance team as payments are received and distributed.


You can also do the following payment-related actions:
- Pay multiple invoices at a time by choosing the needed invoices in the grid using checkboxes and selecting Pay in the upper right of the page. Hide the imageSee the image.

- View and add/edit the payment details of a specific invoice by opening the needed invoice details on the Pending Payment/Paid tab and selecting the Payment Details link. Hide the imageSee the image.

Export invoices
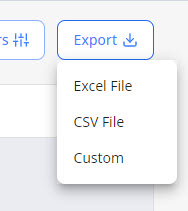
To export details about invoices, select Export on the corresponding tab of the Invoices page and choose the needed format. You can also export specific invoices by choosing the needed records in the grid and selecting Export. Hide the imageSee the image.

By default, all the columns in the grid are exported. By selecting the Custom option, you can change the document title and choose which columns you want to export from the grid.
Watch video