Timesheets 
On Timesheets, approve or reject the submitted Candidates' timesheets, submit Candidate's timesheets, view information on them, and track them. Hide the imageSee the image.

- You may take action on timesheets only if you have the proper permission.
After a Candidate is onboarded and their first day of work starts, the system automatically creates a timesheet with the Incomplete status. Once the work week is complete, the Agency fills in and submits the Candidate's timesheet. You can see the information on your Candidates in the timesheet table and approve time or miles. The timesheets for a Candidate continue to be created until the order reaches its end date or the order/Candidate is cancelled.
Timesheet, Miles, and Expenses
In an opened timesheet, you can see the following tabs: Timesheet, Historical Data, Miles, and Expenses. These form the amount of money that the Organization is going to pay to its partnership Agency:
- Timesheet: Agency adds all working hours of a Candidate for one week. They indicate day, time in, time out, cost center, and bill rate type, and the system automatically creates the final amount for the week. Hide the imageSee the image.
- The bill rate type for working hours can be the following: Regular, Callback, Oncall, Charge, Orientation, and Preceptor. You may only see the types that are approved between Agency and its partnership Organization. Each bill rate type may have a coefficient towards the regular rate.

- Miles: Agency adds all miles spent by a Candidate for one week. They indicate the day, cost center, and miles, and the system automatically creates the final amount for the week. Hide the imageSee the image.
- This tab appears and you may edit it only if your Organization covers miles the Candidate spends to get to work. The bill rate type for miles spent is fixed and approved between the Agency and Organization.

- Expenses: This tab has records if at least one manual invoice, bonus, or penalty was added to this timesheet. You may not submit the amount indicated on the Expenses tab as it was sent as a manual invoice record for approval and shows as an invoice record on Invoices > Manual Invoice Records tab. Hide the imageSee the image.

The Historical Data tab (if not hidden by configuration) displays all changes made for an approved and invoiced timesheet for all dates in the week.
Hide the imageSee the image.

Approve or reject timesheet
Depending on the settings configured for your Organization, the timesheets are approved either automatically after the Agency submits them, or manually.
To review and compare a timesheet to its paper version, you may download the paper timesheet and compare the data entered.
To manually approve a timesheet, open the needed one and select Approve. A timesheet’s status changes to Approved.
To reject a timesheet, open the needed one, select Reject, and provide the rejection reason. A timesheet ’s status changes to Rejected. Next, Agency edits the rejected timesheet and submits it again. This process will repeat until the timesheet is approved.
If Agency with the proper permission has edited a timesheet that was already approved, this timesheet moves into the Pending approval* status. You can review all the highlighted changes and approve or reject this timesheet again.
Fill in and submit timesheet
If you have the proper permission, you may skip the general flow and fill in a Candidate's timesheet without Agency if needed.
To fill in and submit a timesheet:
- Select the needed timesheet in the grid to open the details sidebar.
- In the details sidebar, do the following:
- If you want to submit the timesheet with the Timesheet type, on the Timesheet tab, select Edit or + Add Record, provide all the needed data or edit the needed fields, and then select Save. Hide the imageSee the image.
- An added shift cannot be longer than 24 hours.
- If the shift did not include mealtime, you can specify this by turning on the No Meal Break toggle to have the time calculated correctly. Hide the imageSee the image.


- If you want to submit the timesheet with the Miles type, on the Miles tab, select Edit or + Add Record, provide all the needed data or edit the needed fields, and then select Save. Hide the imageSee the image.

- Select the Expenses tab to check if there are manual invoices, bonuses, or penalties added for the timesheet. Hide the imageSee the image

- If you want to submit the timesheet with the Timesheet type, on the Timesheet tab, select Edit or + Add Record, provide all the needed data or edit the needed fields, and then select Save. Hide the imageSee the image.
- Upload the proofs of the Candidate's work by using Upload in the upper right. These are the signed paper timesheets from the Organization. Hide the imageSee the image.
- The size of the timesheet file must not exceed 20 MB.

- Select Submit to submit the timesheet.
Mark timesheet as DNW (did not work)
If you have the proper permission, you may delete a timesheet by marking it as "Candidate did not work" (DNW) for a specific week regardless of its status. This will exclude working hours, miles spent, or other expenses associated with this timesheet from future invoices and will not allow you to enter new data for this timesheet.
To mark a timesheet as DNW:
- On Timesheets, select the needed timesheet.
- On the details sidebar that opens, turn on the DNW toggle and select Yes in the dialog that appears. Hide the imageSee the image.
- If you have turned on the DNW toggle for a new timesheet with no entries populated, it will appear in the Approved status.
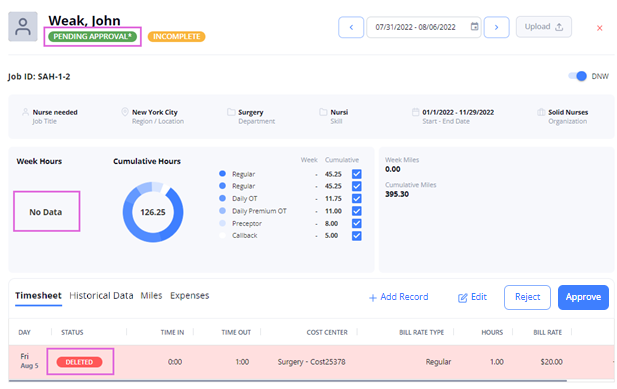
- If you have turned on the DNW toggle for a timesheet with records after approval, it will appear in the Pending approval* status and with the deleted data. Hide the imageSee the image.


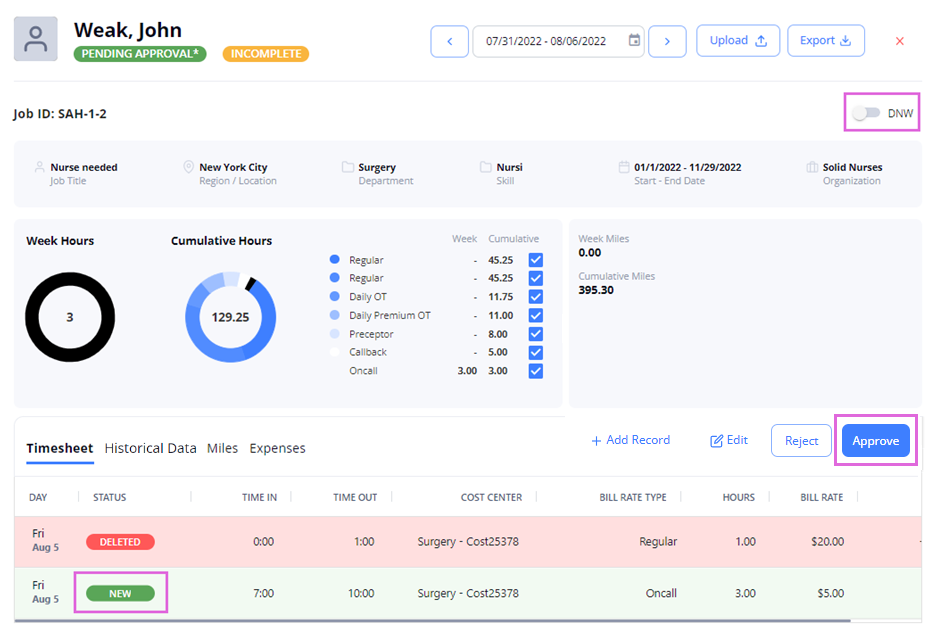
- You may add new data by turning off the DNW toggle, entering new data on the Timesheet or Miles tabs, and selecting Approve. Hide the imageSee the image.

Timesheet statuses
Regardless of your role, you may see all timesheet statuses:
- Incomplete: a timesheet for the current week.
- Pending approval: Agency submitted a timesheet but the Organization has not approved or rejected it yet.
- Pending approval*: Agency edited a timesheet after the Organization had already approved it.
- Missing:
- A timesheet without filled time or miles for the onboarded Candidate.
- Agency has not submitted a timesheet yet.
- A timesheet gets this status on the first day of the next week after it has been created. - Rejected: Agency submitted a timesheet but the Organization rejected it. Agency may add, edit, and submit it again for approval.
- Approved: Organization approved a timesheet.
To find the timesheets of different statuses faster, you can view them on separate tabs. Hide the imageSee the image.

Filter timesheets
Use Filters to access the needed timesheets faster. You can sort the needed timesheets by Candidate name, order ID, status, region, location, department, skill, and contact person. The applied filters will be preserved on this specific page.

Export timesheets
To export details about the timesheets in the grid, select Export on the corresponding tab of the Timesheets page and choose the needed format. Hide the imageSee the image.
You can also export specific timesheets by choosing the needed records in the grid and selecting Export.

By default, all the columns in the grid are exported. By selecting the Custom option, you can change the document title and choose which columns you want to export from the grid. Hide the imageSee the image.

Custom flow
In some cases, Organization can skip a regular flow. If you want to set up a custom flow, contact your Administrator.
Watch video